.png)
How to Import a Roster from SportsEngine (or a CSV)
This section is only available for DNA Soccer Lab customers that have signed up for DNA Soccer Lab through their SportsEngine account.
If you do not have a SportsEngine account, you can still use the process below by uploading your own CSV file.
Before you can Import: Create or log in to your DNA soccer lab account
1. Select the SportsEngine Athlete Importer
2a. Map out the fields that you want to be pulled from the CSV
Other Notes Upon Importing Athletes
Before you can Import: Create or log in to your DNA soccer lab account
If you have already created your DNA Soccer Lab account, skip this step to learn how to import your roster. To create your DNA Soccer Lab account, follow the steps below:
-
Head to this link on your laptop or desktop computer and click Sign up : dnasoccerlabs.gomaxone.com
-
Select your Organization then click Create your DNA Soccer Lab Account
-
Fill in your name, email, phone number, username, and password
-
Enter verification code that was texted to your phone and click Verify Phone Number
-
You're in! Continue to step 2 to begin your import.
1. Select the SportsEngine Athlete Importer
If you aren't a SportsEngine customer click "Upload CSV" instead
-
Click Athletes on the left-hand navigation bar found under Team Management then click either Import from CSV or Import from SportsEngine.
Both options work the same. The SportsEngine option will automatically pull from a registration form already in your SportsEngine account
-
Upload a CSV file from your computer or click the registration form that is pulled from your SportsEngine account.
2a. Map out the fields that you want to be pulled from the CSV
-
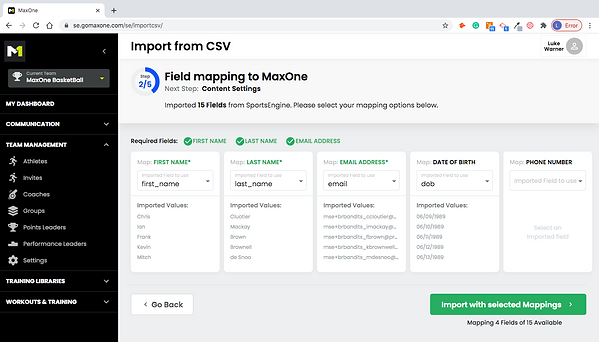
The three required fields are First Name, Last Name, and Email Address since this is the information needed to create accounts and send invites to your athletes.
You can also add Date of Birth and Phone Number. Accounts can still be created without these two fields. They are strictly available for informational purposes if you want to see the phone number and date of birth under the athlete details in their account
-
Click Import with selected Mappings
2b. Athlete Import Review
-
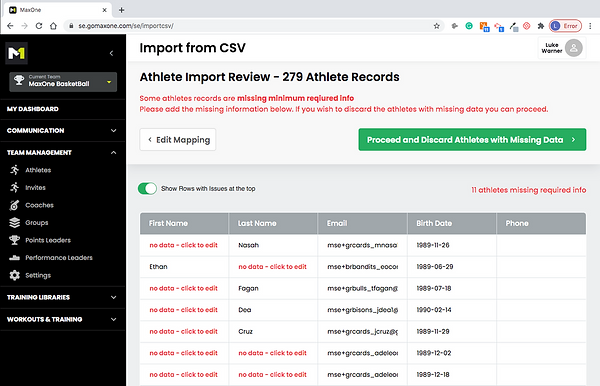
This screen will show a preview of all of the athletes that will be onboarded into your account as well as their information that you pulled from the previous step.
-
If athletes are missing key information such as First Name, Last Name , or Email you can manually input their information so that their accounts are created properly
If you choose not to manually resolve the issues, you may proceed causing the athletes with missing info to be discarded.
3. Once you have looked everything over and manually inputted any athletes that didn't have the proper information, click Proceed
3. Content Library Creation
This step allows you to determine how you want the training libraries and leaderboards to be set up in your MaxOne account. The two options are listed below
-
Option A: One Content Library for All
This option should be selected if you want every athlete in your organization to have access to the same training content and compete on the same leaderboards. Your young athletes, older athletes, male and female athletes, etc. will all have the same content available to them in one master library.
From this one source, you are able to separate these athletes into groups to assign group specific workouts too. However, all athletes would be competing on the same leaderboards.
Directors typically select this option if all of their athletes use the same or at least similar training content.
-
Option B: Multiple Team Content Libraries
This option should be selected if you want to split up athletes into separate groups where each separate group has their own training library. Example: Your 14U athletes could be a group with their own 14U training library. They could only compete with the other 14U athletes on the leaderboards, etc.
Directors typically select this option if the training content and workouts they are delivering are vastly different based on age, gender, or position in their organization.
Once you select how you want your organization to be set up, click Proceed to Next Step
4. Generate Athlete Teams
In this step, you will generate the teams that you want to create based on the data pulled from your CSV file
-
Start by selecting the field from the options listed that you would like to set up as teams in your account.
-
In the video example below, I selected Team Name. From here, I selected each team that I wanted to be created in my account under my organization. The sidebar on the right-hand side of the screen will give you a preview of how many teams will be created, what those team names will be, and how many athletes will be included in each team based on the data you have selected
3. Once you have mapped out the teams you want created, click Generate Teams to continue to the final step
5. Review and Invite Athletes
-
Review that the amount of athletes and teams is correct then either click Import and Invite Now or Import and invite later.
-
Once you invite the athletes, you can click manage athlete invites to check the status of your invites, resend invites, delete athletes, or edit an athlete's information.
-
When athlete's accept the invite, they will show up in their appropriate team under the Athletes tab on the left-hand navigation bar
Other Notes Upon Importing Athletes
-
To toggle between the teams that were created in your account, click Current Team in the top left of your screen then click on the team name of another team to switch to it.
-
To edit team names of the teams that were created, select the team you would like to edit, click Settings under Team Management on the left-hand navigation bar, and edit the Custom Name. Then click Save for the team name to switch.


